
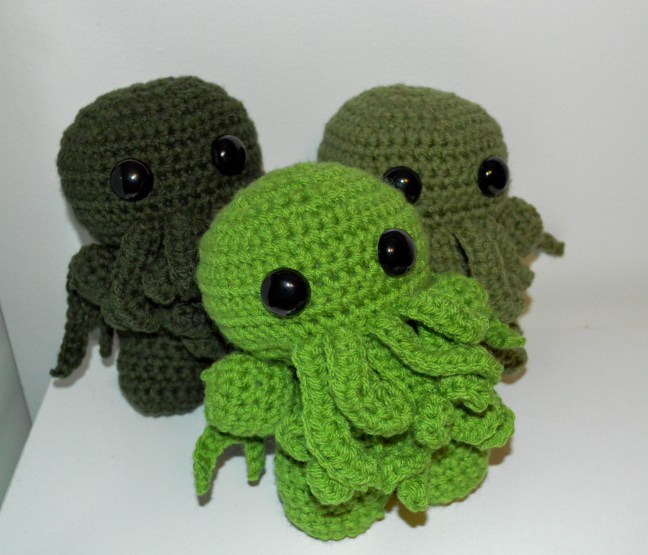
This pattern is very near and dear to my heart. For a long time, I told myself that this was MY pattern and I didn’t want anyone else to have it, but they are just so dang cute and ferocious that I need to share it. Years ago a friend of mine from university made a special request to have a mini Cthulhu custom-ordered. The first one I ever made was a little wonky, but still cute. I revised the pattern over multiple attempts and finally got it the way I wanted. A mid-size plush with oversized eyes, bigger wings, and curly-crazy tentacles.

My Cthulhu received immediate fame on forums and fandom boards on Reddit and Imgur. (My Jumbo Cthulhu earned me a viral-trending badge on Imgur for receiving over 40k views). I sold a bunch of them for Christmas gifts to locals from the Fraser Valley and out of an amazingly-nerdy shop in Downtown Abbotsford, Nerd Haven Games. After having so much fun keeping this little gem to myself, I’d love to share it with all of you.
Introducing, the most fearsome beast in all the universe, the ever-powerful, and somehow the most adorable, Mighty Cthulhu Plush.
This amigurumi pattern is for intermediate crocheters who are comfortable working in the round, shaping flat pieces, and assembling different pieces.
Supplies:
- Size 8-G/5.00 mm crochet hook
- Approx 100. Yards of medium (4) acrylic yarn
- Poly-fil to stuff your plush
- Two 22 mm safety eyes with backings
- I buy mine from this supplier and they never disappoint!
- Yarn needle
- Scissors
Notes:
- This pattern is worked in multiple pieces and then assembled
- The legs and body start separate, but then are crocheted together to reduce the number of seams
- Maintaining tight tension will improve the longevity of your plush
- Overstuffing your plush is ideal as poly-fil condenses over time (depending on the hours of cuddles your Cthulhu receives). Don’t overstuff to the point where your fabric begins to stretch—just so that your plush is dense
- If choking-hazards are a concern, you can crochet black circles for eyes instead of using plastic safety eyes
- Magic Circle with 4 sc
- Sc 2 in each stitch
- Join with sl st
- Fasten to head with yarn needle and simple running stitch
- Want some tips and tricks to improve your amigurumi skills? Read my blog post with my top 5 tips for creating the perfect plush!
Pattern
Head:
Round 1: Magic circle with 6 sc, join with a sl st, ch 1, turn (6)
Round 2: Insert hook in second stitch from hook and inc in each stitch around, join with a sl st, ch 1, turn (12)
Round 3: *Sc 1, inc, repeat around from *, join with a sl st, ch 1, turn (18)
Round 4: *Sc 2, inc, repeat around from *, join with a sl st, ch 1, turn (24)
Round 5: *Sc 3, inc, repeat around from *, join with a sl st, ch 1, turn (30)
Round 6: *Sc 4, inc, repeat around from *, join with a sl st, ch 1, turn (36)
Round 7: *Sc 5, inc, repeat around from *, join with a sl st, ch 1, turn (42)
Round 8-12: Sc around, join with a sl st, ch 1, turn (42)
Tentacles:
Note: There are 3 different types of tentacles. I am going to write out the instructions for the two rounds that include tentacles, but please see the section “Tentacles” to learn how to crochet each type.
Round 12: Sc 18, Tentacle 1, sc 2, Tentacle 2, sc 2, Tentacle 1, sc 2, Tentacle 2, sc 18, join with sl st, ch 1, turn (42)
Round 13: Sc 18, Tentacle 1, sc 2, Tentacle 3, sc 2, Tentacle 1, sc 2, Tentacle 3, sc 17, join with sl st, ch 1, turn (42)
Note: Round 13 should be crocheted with the tentacles hanging UNDERNEATH Round 12’s tentacles
Round 14: *Sc 5, dec, repeat around from *, join with sl st, ch 1, turn (36)
Round 15: *Sc 4, dec, repeat around from *, join with sl st, ch 1, turn (30)
Round 16: *Sc 3, dec, repeat around from *, join with sl st, ch 1, turn (24)
Insert your safety eyes now. I inserted mine in the 10th row over the two outside tentacles.
Round 17: *Sc 2, dec, repeat around from *, join with sl st, ch 1, turn (18)
Stuff your head as much as possible!
Round 18: *sc 1, dec, repeat around from *, join with sl st, ch 1, turn (12)
Round 19: Dec around and fasten off. Weave in your end.
Tentacle Breakdown:
Tentacle 1: Ch 11, insert hook in third chain from hook and hdc 3 in next 2 stitches, hdc 2 in next 3 stitches, hdc to end, join to original ch with a sl st
Tentacle 2: Ch 13, insert hook in third chain from hook and hdc 3 in next 4 stitches, hdc 2 in next 2 stitches, hdc to end, join to original ch with a sl st
Tentacle 3: Ch 15, insert hook in third chain from hook and hdc 3 in next 5 stitches, hdc 2 in next 3 stitches, hdc to end, join to original ch with a sl st
Legs (Make 2) – Continues into Body
Round 1: Magic circle with 6 sc, join with sl st, ch 1, turn (6)
Round 2: Inc in each sc around, join with sl st, ch 1, turn (12)
Round 3: *Sc 1, inc, repeat around from *, join with sl st, ch 1, turn (18)
Round 4-7: Sc around, join with sl st, ch 1, turn (18)
Join legs with 5 sl st
Round 8: From your last sl st, sc in each stitch around the two legs (but NOT the sl st joined section), join with sl st, ch 1, turn (30)
Round 9-13: Sc around, join with sl st, ch 1, turn (30)
Round 14: *Sc 3, dec, repeat around from *, join with sl st, ch 1, turn (24)
Round 15: Sc around, join with sl st, ch 1, turn (24)
Round 16: *Sc 2, dec, repeat around from *, join with sl st, ch 1, turn (18)
Round 17: Sc around, join with sl st, ch 1, turn (18)
Round 18: *Sc 1, dec, repeat around from *, join with sl st, fasten off leaving a 12 inch tail for seaming (12)
Arms (Make 2)
Round 1: Magic circle with 5 sc, join with sl st, ch 1, turn (5)
Round 2: Inc in each stitch around, join with sl st, ch 1, turn (10)
Round 3-6: Sc around, join with sl st, ch 1, turn (10)
Round 7: Sc around, join with sl st, fasten off and leave a 12 inch tail for seaming
Wings (Make 2)
Start with a ch of 4
Row 1: Insert hook in second chain and sc 4, then ch 4
Row 2: Insert hook in second chain from hook and sc 6, ch 1, turn
Row 3: Insert hook in second chain from hook and hdc 3, then ch 5
Row 4: Insert hook in second chain from hook and sc 7, ch 1, turn
Row 5: Insert hook in second chain from hook and hdc 4, then ch 6
Row 6: Insert hook in second chain from hook and sc 9, ch 3 (this is the “bump” on the top of the wing)
Sc 7 down the length of your wing. Fasten off and leave a 12 inch tail for seaming
Seaming
Prior to seaming, make sure all pieces are stuffed to your liking (the arms and body).
The first join will be the head to the body. Using the yarn from the body, run a simple slip stitch joining the head to the body. I like to position the head slightly forward, so the back of the head and the back of the body are more in line. This provides more room at the front of the body for the tentacles to hang comfortable without being pushed forward by the body.
Join the arms to the side of the body, near the top of the body where the seam for the head is located.
The wings are the tricky part. I sewed them on flat so they would hang with the individual tips pointing down near the outside edge of the body. To keep your wings upright run a stitch that joins the wing to the underside of the head/top of body wherever is comfortable. This is optional, but I found it helped to keep the wings in a better place so they couldn’t flop all over.
Weave in all of your ends and you are done!
Ta daa! You have created the most fearsome beast in all the land, the mighty, and somehow adorable, Cthulhu! Now, go and impress your friends with your work of amigurumi art.
As always, I love to see your work! Please tag me in any pictures or posts of your Cthulhu plushies so I can admire your handiwork. Also, please credit this pattern where it is due. I was never going to release this pattern, so now that I have, I want EVERYONE to have it!
Let me know in the comments below if you have any questions about the pattern. Happy crocheting!

Awww.. they r so squiggly and cute
LikeLike
I love making these! 🙂
LikeLike
Can you please tell me how tall these are?
LikeLike
I would say about 7-8 inches tall! Depending on your choice of yarn and gauge. The pattern is variable though, you could make a super chunky one with a larger hook. The pattern would be the same, but your final product would be larger 🙂
LikeLike
for the head, row 6 to row 7… how do you go from 36 stitches in round 6 to 42 stitches in round 7 if youre only single crocheting in round 7?
LikeLiked by 1 person
and wheres the body part im so lost
LikeLike
When you look down the legs section it shows where you connect the legs, and I assume the rest of the “legs” section is the body. However, I too am confused about the jump from 36 stitches to 42? @stringsandthingss, please help!!
LikeLike
There was one line missing at the beginning of the pattern which I missed ,and I apologize for that! If you go back and check now it will add up to 42. You’re right, the legs continue into the body.
LikeLike
You don’t this pattern is riddled with errors and mistakes, I am rewriting it. The mistakes start in R3 of the head and continue throughout. The body is completely missing in this pattern as well.
LikeLike
Thank you for bringing that to my attention in R3! I have gone through and adjusted/fixed the pattern. If you read closely, you’ll see the legs section actually contains the body. I have updated that section to say “Legs & Body” just so there is no more confusion.
LikeLike
I have added to the “legs” section that the body continues from there. It was always in the pattern if you followed it step by step 🙂
LikeLike
Here is what I did below to fix the errors. I am now having trouble with the wings and that is the last thing I have to do 😦
I worked in the round and didn’t join and turn. Just marked each row as I went.
HEAD
Round 3…sc 1 and inc -repeat around
Round 4 sc 2 and inc -repeat around
Round 5…sc 3 and inc -repeat around
Round 6… sc 4 and inc -repeat around
Round 7…sc 5 and inc- repeat around
Rounds 8-11 sc around (42)
LEGS
Row 14…24 sc
Row 15…24 sc
Row 16….18 sc
Row 17…18 sc
Row 8…12 sc
LikeLike
Yes, thank you so much! Those were the numbers I had as well, looks like I forgot to add them into the notes.
LikeLike
I apologize, there was one line missing from the beginning of the pattern. I have corrected it and now the math all works out perfectly to end with 42 stitches going around for the head.
LikeLike
Sooo many mistakes and they start in R3 of the head. You cant increase from 12 to 18sc if you do” sc2,inc”around. It HAS to be “sc,inc” around. Please proofread and practice the pattern you write out to make sure it actually works before publishing. While once I fixed all the mistakes it made a cute Cthulhu. Having to fix the mistakes after completing the round and not having the needed stitches is beyond frustrating!
LikeLike
Sorry you were frustrated with it, but obviously you were able to figure it out so that’s great news! I have updated the few errors in the pattern, looks like I accidentally omitted the *sc 1, inc step, but it is in there now.
LikeLike
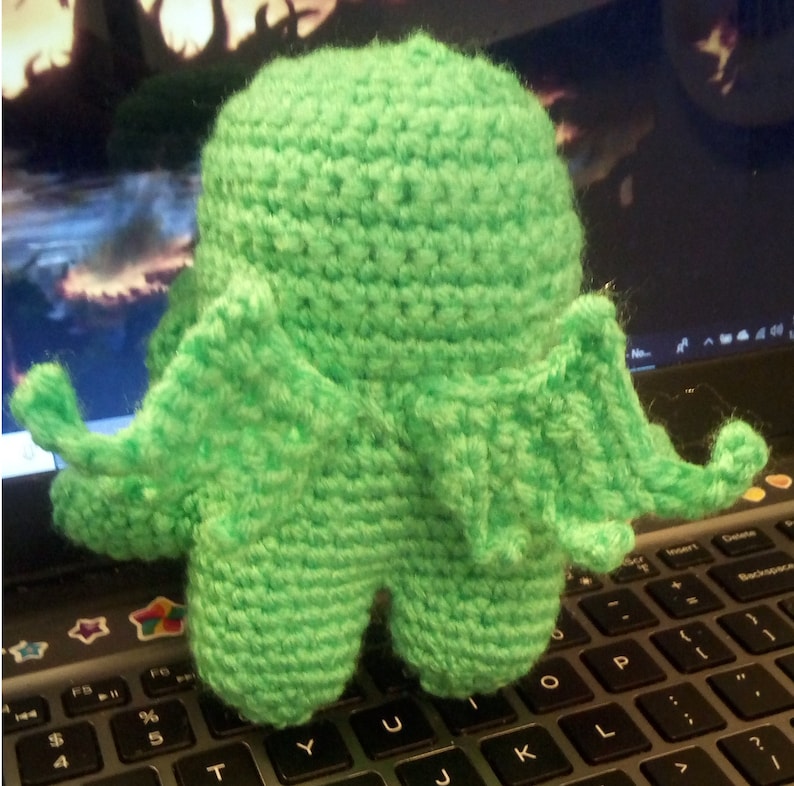
I’m having real difficulty with the wings . Is there a photo of the shape tney are supposed to be?
LikeLike
The wings are definitely the trickiest part! You word side to side, making each little “prong” of the wing every two rows (hopefully that makes sense). There should be an image of the back of one of the completed Cthulhus to see what the wing shape looks like.
Let me know if that helped at all!
LikeLike
I rewrote that section because it confused me so much:
Row 1: ch of 5, turn (your next row will always begin in 2nd stitch from hook)
Row 2: sc 4, ch 4, turn
Row 3: sc 6, ch 1, turn
Row 4: hdc 3, ch 5, turn
Row 5: sc 7, ch 1, turn
Row 6: hdc 4, ch 6, turn
Row 7: sc 9, ch 3, turn. You are now at the very top, outside peak of the wing. Row 7 is the outside edge of the wing.The tail you left at the other end is the inside edge of the wing, where it attaches to the body.
Row 8: Sc down the TOP side of your wing (NOT down the outside edge of the wing, AKA Row 7). Fasten off and leave a long tail for seaming.
Here’s a picture of the finished wings:
LikeLike
I’m confused on the tentacles. How do you do a hdc 3 in 2 st and a hdc 2 in 3 st?
LikeLike
I’ll try to phrase more carefully! And also, my apologies for not responding to this comment for EVER!
When working back up the tentacle, you need to make 3 hdc in 2 stitches. So over 2 stitches there will be 6 total (3 in each). Same for the next step. Hdc 2 in the next 3 stitches. So over those 3 stitches there will be 6 hdc total (2 in each). Hopefully that helps!
LikeLike
I am so confused about the body! I know that it continues in the legs, but does it go all the way around, or is it just one side? Is there a picture that shows to body clearly? Over all you did a great job, and I love the patter. It’s just this one part!
LikeLike
This is a cute pattern. I’m having great difficulties with the wings as I’m still a movie with pattern reading. Any hints or suggestions? I’ve tried several times and have failed each time lol.
LikeLike
OMG I feel like an idiot! I got it. For some reason (I’m sleep deprived right now) I kept reading sc as a ch. the results look pretty cool. Figured it out now!
LikeLike
Are there 3 or 4 tentacles?
LikeLike
There are actually 8! There is one row of 4, and then a second row of 4 🙂
LikeLike
Hi! I was wondering about seaming everything together? Do you stuff and sew closed the head, arms, and body then seam together?
LikeLike
The only body part I close fully is the head! Everything else I leave open and seam directly together so the arms and neck don’t look small in comparison to everything else. Hopefully that helps!
LikeLike