
In celebration of Labour Day, I have decided to release a free pattern!
Last Easter I was searching for a cute rabbit pattern, but wasn’t having much luck. After much digging I came across a super cute pattern, except it wasn’t written in English. So after a few hours of trying to translate, testing the pattern, and making a few of my own revisions, I had it put together in something that I could understand! If you are interested in checking out the original pattern in its original language, you can do that here.
If you aren’t big into crochet but still really want one of these adorable bunny rabbits, you can purchase one from my Etsy shop by clicking this link!
Without any further adieu, here is my first FREE pattern!
Amigurumi Bunny Rabbit

Notes
This is a great pattern because you can make it in any yarn weight with any corresponding hook size. You will just get a larger bunny the thicker yarn you use, and vice versa. Gauge is not important!
The head and body are made in one piece. All other pieces are made separately and then stitched on afterwards. Eyes can be either stitched on or plastic safety eyes.
The finished product will be anywhere from 6-10 inches tall.
Supplies
- Yarn in your choice of colour and weight (I used Caron “Simply Soft” in Soft Blue and only used about 50 yards)
- Small amount of white yarn for tail
- Small amount of pink yarn for nose
- Small amount of black yarn for eyes OR safety eyes in your choice of size (I used 7 mm eyes)
- Corresponding crochet hook (I used G/6-4.25 mm)
- Polyfil stuffing (or similar product)
- Yarn needle
- Scissors
Abbreviations
- sc – single crochet
- ch – chain
- sl st – slip stitch
- inc – increase (2 single crochets in one)
- dec – decrease (crochet 2 together)
Head and Body
Round 1: Magic circle with 6 sc, join with a sl st in first sc, ch 1, turn (6)
Round 2: Inc in each sc, join with a sl st in first sc, ch 1, turn (12)
Round 3: *sc, inc, repeat from *, join with a sl st in first sc, ch 1, turn (18)
Round 4: * 2 sc, inc, repeat from *, join with a sl st in first sc, ch 1, turn (24)
Round 5: *3 sc, inc, repeat from *, join with a sl st in first sc, ch 1, turn (30)
Round 6: *4 sc, inc, repeat from *, join with a sl st in first sc, ch 1, turn (36)
Round 7-11: sc around, continue joining with a sl st in first sc of each round, ch 1, turn (36)
Attach safety eyes in roughly round 9 or 10, and sew a pink X for a nose in roughly round 10 or 11
Round 12: * sc 4, dec, repeat from *, join with a sl st in first sc, ch 1, turn (30)
Round 13: * sc 3, dec, repeat from *, join with a sl st in first sc, ch 1, turn (24)
Stuff head
Round 14: * sc 2, dec, repeat from *, join with a sl st in first sc, ch 1, turn (18)
Round 15: * sc, dec, repeat from *, join with a sl st in first sc, ch 1, turn (12)
Round 16: * 2 sc, dec, repeat from *, join with a sl st in first sc of round, ch 1, turn (9)
Round 17: * sc 2, inc, repeat from *, join with a sl st in first sc, ch 1, turn (12)
Round 18: * sc, inc, repeat from *, join with a sl st in first sc of round, ch 1, turn (18)
Round 19: * sc 2, inc, repeat from *, join with a sl st in first sc of round, ch 1, turn (24)
Round 20-22: sc around, continue joining with a sl st in first sc of each round, ch 1, turn (24)
Stuff body
Round 23: * sc 2, dec, repeat from *, join with a sl st in first sc of round, ch 1, turn (18)
Round 24: * sc, dec, repeat from *, join with a sl st in first sc of round, ch 1, turn (12)
Round 25: dec around, join with a sl st in first sc of round (6)
Fill with any more stuffing you can and fasten off. Weave in ends.
Legs (Make 2)
Round 1: Magic circle with 6 sc, join with a sl st in first sc of round, ch 1, turn (6)
Round 2: inc in each, join with a sl st in first sc of round, ch 1, turn (12)
Round 3: * sc, inc, repeat from *, join with a sl st in first sc of round, ch 1, turn (18)
Round 4-5: sc in each, continue joining with a sl st in first sc of each round, ch 1, turn (18)
Round 6: * sc, dec, repeat from *, join with a sl st in first sc of round, ch 1, turn (12)
Round 7: dec around, join with a sl st in first sc of round, fasten off (6)
Leave roughly an 8 inch tail for attaching to body
Arms (Make 2)
Round 1: Magic Circle with 4 sc, join with a sl st in first sc of round, ch 1, turn (4)
Round 2: inc in each, join with a sl st in first sc of round, ch 1, turn (8)
Round 3: sc in each, join with a sl st in first sc of round, ch 1, turn (8)
Round 4: * sc 2, dec, repeat from *, join with a sl st in first sc of round, ch 1, turn (6)
Round 5: sc in each, join with a sl st in first sc of round, fasten off (6)
Leave roughly an 8 inch tail for attaching to body
Ears (Make 2)
Round 1: Magic Circle with 5 sc, join with a sl st in first sc of round, ch 1, turn (5)
Round 2: inc in each, join with a sl st in first sc of round, ch 1, turn (10)
Round 3: * sc, inc, repeat from *, join with a sl st in first sc of round, ch 1, turn (15)
Round 4-5: sc in each, continue joining with a sl st in first sc of each round, ch 1, turn (15)
Round 6: * sc 3, dec, repeat from *, join with a sl st in first sc of round, ch 1, turn (12)
Round 7-9: sc in each, continue joining with a sl st in first sc of each round, ch 1, turn (12)
Round 10: * sc, dec, repeat from *, join with a sl st in first sc of round, ch 1, turn (9)
Round 11: sc around, join with a sl st in first sc of round, ch 1, turn (9)
Round 12: * sc, dec, repeat from *, join with a sl st in first sc of round, fasten off (6)
Leave roughly an 8 inch tail for attaching to body
Tail (Make in white or your choice of colour)
Round 1: Magic Circle with 4 sc, join with a sl st in first sc of round, ch 1, turn (4)
Round 2: * sc, inc, repeat from *, join with a sl st in first sc of round, fasten off (6)
Leave roughly an 8 inch tail for attaching to body
Assembly
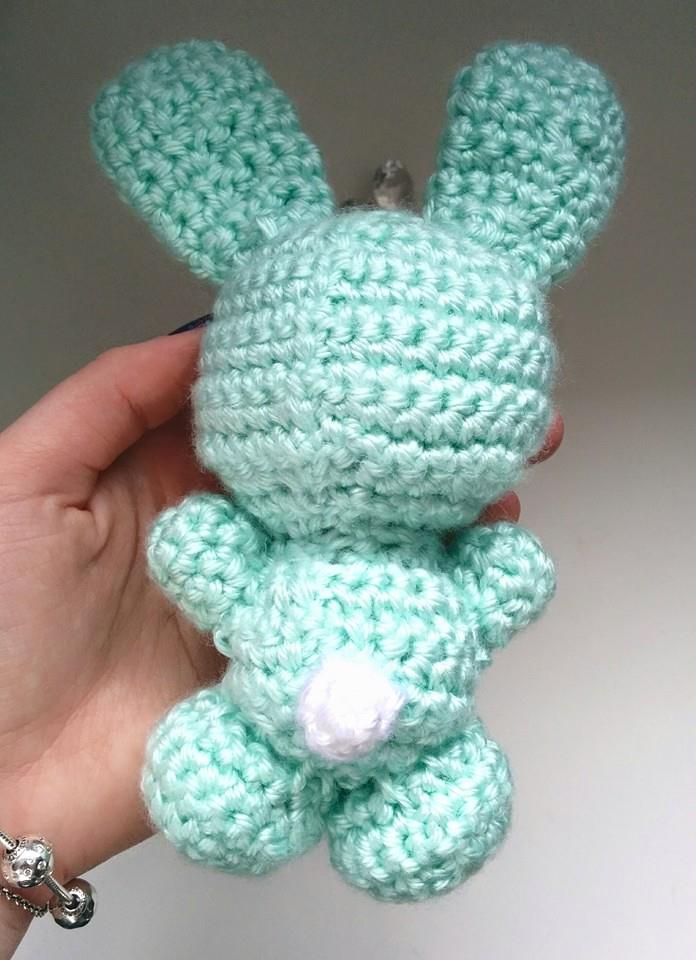
Now that you have your body put together and all of the body parts made, it’s time to assemble your bunny rabbit! I like to sew on the arms and legs first so I have a good idea of where my center is on the body. Stuff the arms and legs with a little bit of polyfil (or other stuffing). Use your yarn needle to sew arms and legs in proper spots (you can follow my picture for a guide). Pull yarn tight to close up any holes in the join. Knot and weave in ends.
Next, sew on the ears. I find it helps to attach both ears with sewing pins to ensure that they are even before sewing them down. Again, you can follow my picture for guide! Do not stuff the ears! I mean, you can if you’d like too, but they will be way too heavy and won’t stay up nice and straight. Pull yarn tight to close up any holes in the join. Knot and weave in ends.
Lastly, sew on the tail. This is probably the easiest part, but it is important to leave it for last so you can make sure it is directly in the center of the body. Use the arms, legs, and ears to help guide you. Pull yarn extra tight. This will make the tail poof up a bit and look more rounded. Knot and weave in ends.
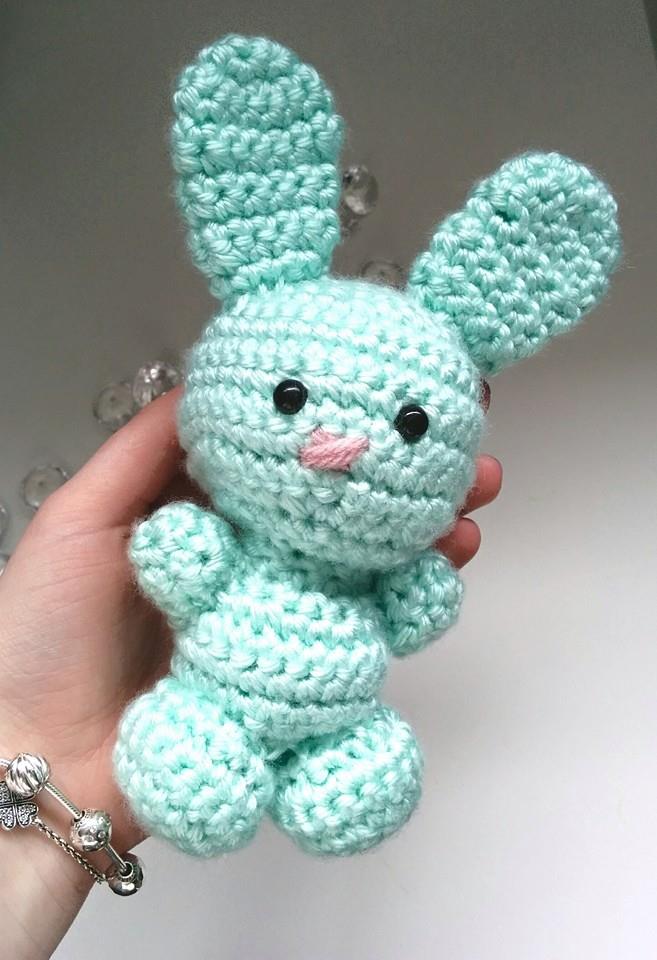
Ta daa! You have an adorable bunny rabbit! Please let me know if you have any questions regarding this pattern and I will do my best to help. Also, let me know if there are any parts of the pattern that don’t make any sense. This is the first pattern I have written so I’m sure there are some mistakes somewhere, or steps that don’t make sense.
Enjoy your Labour Day! Share any pictures of your amigurumi bunny rabbits with me in the comments!
*Note: This pattern was written for the intent to share with everyone. You may sell any finished products using this pattern, but please credit my page accordingly. Please do not redistribute this pattern as your own.

What a lovely pattern! Definitely need to try this one out.
Where do you find your safety eyes, if I may ask?
LikeLike
I purchase mine on Etsy! There are tons of people who sell them, even a few who offer free shipping all over the world.
LikeLike
You might want to revise your pattern because I found one row that is wrong. Ears Round 10: * sc, dec, repeat from *, join with a sl st in first sc of round, ch 1, turn (9). This doesn’t add up though. The previous row ended in 12 stitches. Row 10 would end in 8 stitches. It should actually be *2 sc, then decide.* This will make the row end in 9 stitches.
LikeLike