

I know some of you may disagree with me, but I’m just going to say it anyways. I hate summer. While having time off is fun, and lots of exciting events take place during the summer, it is just not my cup of tea. Too hot. Too many bugs. Too sunny (I am am quite pale so I think that is self-explanatory).
Thankfully this summer has gone by extremely quickly! I can’t believe it is August already. We have had a fairly mild summer so far on the coast of British Columbia, but I am really looking forward to the crisp mornings and chilly evenings of fall.
Knowing that fall is just around the corner has put me in high gear for market prep and pattern designing. I am cranking out beanies and scarves like crazy and my yarn stash is rapidly depleting. I have even made a few things for myself for once!
I have been tinkering with a beanie pattern in the past few weeks, and I think I’ve finally perfected it. What better way to celebrate the fact that my favourite season is closing in on us than by sharing a free pattern?!

This is definitely one of those no-brainer patterns. After I completed my first one I seriously shook my head and thought to myself, “Why on Earth did I think this would be so hard?!”
Playing with measurements can be tricky, but thankfully this pattern is 100% adjustable for both length and circumference/width. I’ve done some experimenting and I have come up with a few yarn weight/needle size/and stitch combinations to make different sizes and styles!

I’ll start out with my most favourite style and size and hopefully you’ll get the idea of how to adjust this pattern and create all sorts of shapes and sizes!
The Classic Beanie
A pattern for beginner knitters. This beanie will fit an average woman’s (or even teenager’s) head in a slouchy style!
Supplies:
- Approximately 60-70 yards of super bulky yarn OR 2 strands of any worsted weight yarn
- I used Lion Brand Wool Ease Thick & Quick for the bulky version
- I used Loops N’ Threads Impeccable for the worsted version
- Size 13/9.00mm short circular needles with a 16 inch cable
- Stitch marker
- Scissors
- Yarn needle
- Pom pom maker (optional)
- I used the Clover Pom Pom Maker, it’s amazing!
The Pattern
- Use your favourite cast on method and cast on 40 stitches
- Use your stitch marker so you know where the beginning of each round is
- Ribbing – * K1 P1, repeat from * around for 10 rounds
- Knit around normally for 15 rounds
- Decrease
- * K3, k2tog, repeat from * around
- Knit one round normally
- *K2, k2tog, repeat from * around
- Knit one round normally
- *K1, k2tog, repeat from * around
- k2tog around for the remaining stitches
- Break your yarn and use a yarn needle to weave the tail in through each stitch. Pull tight to close the top of the hat
- Use your pom pom maker (or whatever method you prefer) to make a nice big pom pom to sew to the top of your beanie
- This step is optional! I just love pom poms!
- Weave in your ends
You now have a beautiful chunky hat to keep you warm all fall and winter long!
Here are a few other size options I have various yarn weights and sizes:

Chunky Men’s Beanie
- Cast on 42
- Follow the same steps as the original pattern EXCEPT:
- Work the ribbing for 11 rounds
- Knit normally for 16 rounds
- Follow the same decrease method. If you have extra stitches just knit them normally to maintain a nice looking decreased top of hat
Chunky Children’s Beanie (age 1-3 roughly)
- Cast on 32
- Follow the same steps as the original pattern EXCEPT:
- Work the ribbing for 8 rounds
- Knit normally for 12-13 rounds depending on preference
- Follow the same decrease method
Fitted Women’s Beanie
- Use bulky size 5 yarn
- Cast on 56
- Follow the same steps as the original pattern EXCEPT:
- Work the ribbing for 13 rounds
- Knit normally for 20 rounds
- Follow the same decrease method. If you have extra stitches at the end of your rounds, just knit them normally to maintain a nice looking decreased top of hat
This is an amazing pattern that can easily by adjusted, changed, or customized to fit anyone and everyone. I bet I’ve made close to 50 of these beanies so far for market prep and early fall orders. Trust me, they will be a hit with everyone.
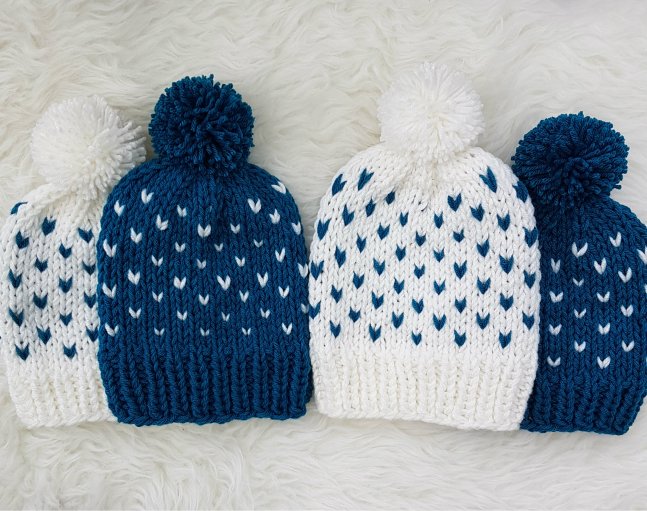
Experiment with stripes and different sizes. Create fitted beanies and super slouchy beanies. Try incorporating a little bit of some fair isle style! The possibilities are endless.
Let’s connect on social media! Use the hashtag #classicbeanie so I can see all of the beautiful creations you come up with using this pattern. Don’t forget to subscribe to my blog and follow me on Instagram and Facebook!
Have fun!

I love this pattern but would love to figure out how to convert using a #4 worsted weight yarn. How many to cast on etc.
I would greatly appreciate any insight.
Thanks,
Sue
LikeLike
Thanks!! Love that you gave so many size options 😀
LikeLike
What does the * represent?
LikeLike
Hi ! I’m little confused that at the beginning of ur post u say Super Bulky #6 then in the listed pattern u says bulky #5 ? Are these 2 weights of yarn interchangeable? Thank you
LikeLike
The pattern provides instructions for how to make the same type of torque but with different needles and yarn weights depending on what you have available!
LikeLike